


If you’re contemplating a switch to Showit but are curious about its blogging mechanism and how everything integrates with WordPress, this post is your comprehensive guide. I’ll go over how WordPress blogging works when you have a Showit website.

Note: Some links are affiliate links. I may receive a commission for sharing my favorite tools with you, but they won’t cost you anything more. I’ll sometimes even share a discount for you. ◡̈
The Power of Blogging
First, let’s discuss the ‘why’ behind blogging. Blogging is a powerful tool for businesses of all sizes. A well-crafted blog post can drive organic traffic to your website long after it’s published. These posts become more valuable over time, attracting and converting potential leads. Think about it – have you ever been swayed by a well-written article? The return on investment for a blog post, in terms of time and effort, often surpasses that of content on platforms like Instagram.
Showit & WordPress Integration
Showit is a design-centric website builder. It allows you to craft your blog’s visual layout to perfection. However, when it’s time to manage and post your blog content, WordPress comes into play. After setting up your Showit account, a simple request to the Showit team will integrate your blog. Once they work their magic, you can start publishing posts through your WordPress Admin panel, and they’ll automatically appear on your Showit website with the layout you created.
Want to try out Showit for free? As a design partner, I can provide you with a free month of Showit on top of their free trial—claim your free month right here.
Designing Your Showit Blog Layout
Under the ‘Blog Templates’ section in Showit, you’ll find placeholders for your blog design. Depending on your chosen template, you’ll see layouts for:
- Post List (Main Blog Page): This is your blog’s landing page, showcasing all your posts. You can design it to your heart’s content, using placeholders that will later fetch data from WordPress.
- Single Post: This template determines how individual blog posts appear. Like the main blog page, you’ll use placeholders here.
- Additional Templates: These might include designs for categories, search results, and error pages.
With Showit, you have full flexibility. You can opt for a range of designs, from single post rows to alternating or side-by-side layouts. To navigate trickier designs, Showit offers a variety of tutorials to guide you.
But designing a blog layout from scratch in Showit can be time-consuming, especially if you’re not sure where to start or what elements to include. If you’d rather skip straight to a professionally designed blog that’s ready to customize with your branding, we’ve got you covered!
Skip the Design Work & Use a Pre-Designed Blog Template
Our Audrina Blog Add-On Page Template ($80) is perfect if you already have a Showit website and just need to add a beautiful blog layout. Simply add it to your Showit library, customize it with your brand colors and fonts, and you’re ready to start blogging!
If you’re building your entire website (or doing a redesign), all of our full Showit website templates come with professionally designed blog layouts already included. Browse Our Complete Showit Templates.
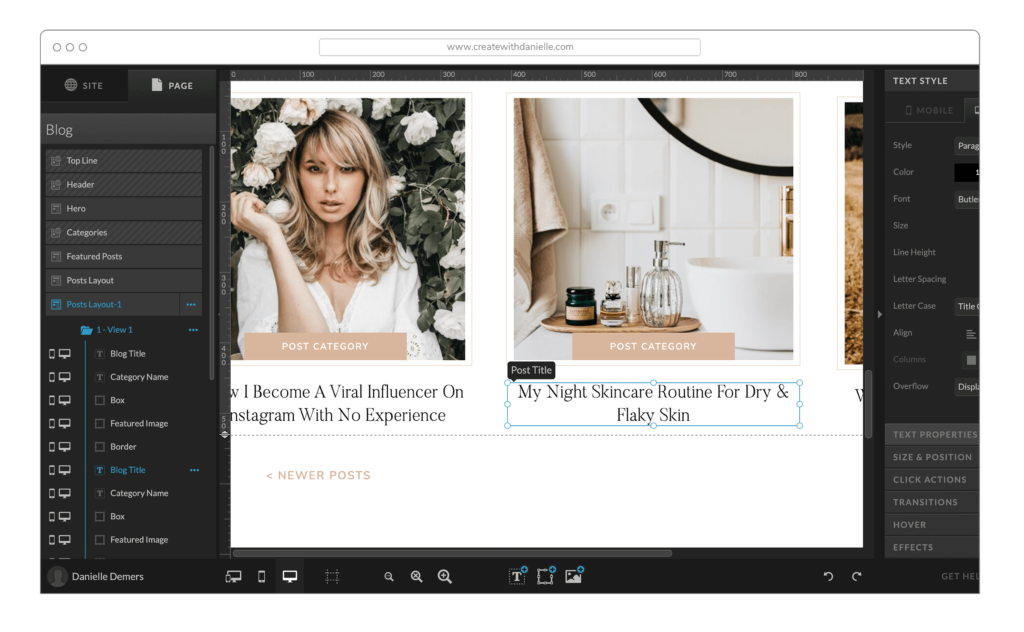
Post List – Main Blog Page
If designing yourself, you can design your blog layout however you’d like! Keep in mind that no blog content will be posted directly on Showit. As you see in the image below, the title design is linked to “Post Title”. This means that the placeholder will pull information from your connected WordPress account, and place your blog post title here when it’s published. You will see other placeholders for your blog. This includes featured image, post title, post date, category name, excerpt, post button, or other features depending on the design you’d like, or what’s included in your template. These can be changed in the Text Properties, on the right-hand side of Showit.
There are various layouts you can design! For example, you can create 1 post per row, side-by-side or alternating! This depends on the template you chose or the layout you’d like. Side by Side blog posts can be a little trickier, here’s a tutorial from Showit if you’re wanting to achieve this look.
Single Post Page
Single Post page will grab your actual blog post content to display your individual posts. Same as the post list page, there are placeholders that will take information directly from WordPress. Therefore, you won’t need to write any actual content in Showit. If you’re wanting to add a sidebar, add a date area or comment section – this is all done on Showit.
Writing your WordPress Blog Posts
Once your blog’s design is locked in, it’s time to populate it with content. Logging into your WordPress Admin and navigating to “Posts” will allow you to craft your articles. Here, you can utilize the user-friendly interface to add headings, images, and other elements to your posts. Additionally, the right-hand panel offers settings for featured images, categories, and tags.
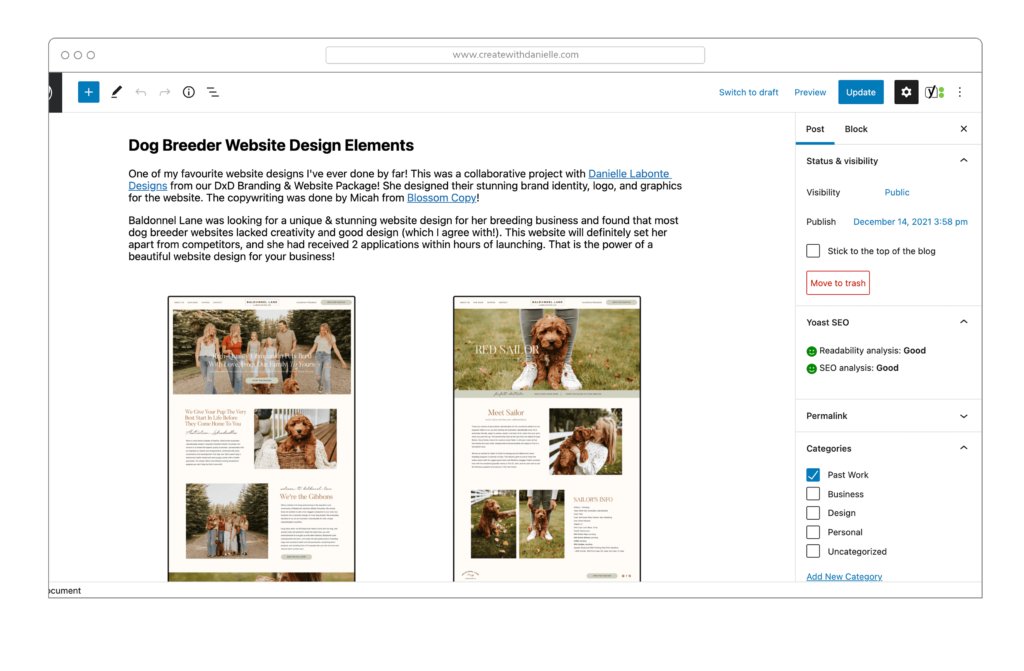
WordPress Blog Plugins + Yoast SEO
I recommend looking at all of the different settings and plugins that WordPress offers in your admin. Depending on the Showit plan you’ve chosen, you may have access to fewer/more plugins. The one plugin I highly suggest turning on is Yoast SEO, to increase your ranking on search engines for your posts. Once activated, Yoast SEO will appear on every post, guiding you to make your content more search engine friendly.
Publishing your Blog Post
Before hitting that ‘Publish’ button, always preview your post. This allows you to see how your content looks within your Showit design. Once you’re satisfied, publishing the post will automatically update your Showit blog.
Having Issues with Anything Blog Related?
If you ever find yourself stuck or facing issues, Showit’s extensive library of tutorials is there to assist. Whether you want to add a comments section, optimize images, or any other customization, there’s likely a guide waiting for you.
Ready to Start Blogging?
If you’re ready to elevate your online presence but need a helping hand, I’m here for you. My custom website packages and Showit templates come blog-ready. All of my custom website packages & Showit website templates in my template shop offer blog templates. If you’re not blogging in today’s world as a small business, it’s the perfect time to get started.

Feminine, Clean, Modern
Jessie Showit Template
Compatible With:

Budget-Friendly Showit Templates: Designed to help beginners create stunning websites with confidence. Starting at $275.

Bold, Editorial, Luxurious
Hailey Showit Template
Compatible With:


Inviting, Clean, Calm
Stacey Showit Template
Compatible With:

flodesk Email Templates
Showit Website Templates

Welcome Email Template
Jessie Flodesk Template
Compatible With:

DIY Email Templates: Pre-designed email templates that help you connect with your audience and grow your business.

Welcome Email Template
Hailey Flodesk Template
Compatible With:


Package & Pricing Email Template
Audrina Flodesk Template
Compatible With:

flodesk Email Templates
Showit Website Templates
Shop Our Best-Selling Design Templates


We help create a strategic custom designs that reflects who you really are, helps you reach your biggest business goals, and positions you as the expert you are. From comprehensive brand strategy and logo design to custom Showit websites you can actually update yourself, we handle every detail so you don't have to. Let's create something you'll be proud to call yours.
We take the time to understand your vision (& bring it to life for you)
Certified Showit & Flodesk Design Partner, hundreds of happy clients worldwide, and 3 consecutive "Best Web Designer" awards in our county.

Maybe your website is pretty good, but something feels off and you're wondering if it's time for an overhaul? Our comprehensive website audit checklist helps you evaluate your current site like a pro. Find out exactly what your site needs.
Get Your free audit checklist
Not sure if you need a full redesign or just some tweaks?

