


If you’ve been wondering how to create a featured or recent posts section on your Showit website, then this post is for you. We get this question all the time from our template customers, so we thought, why not share a step-by-step guide to help make it easier for you to showcase your latest (or most important) posts in style?
Creating a featured or recent posts section on your Showit website doesn’t have to be complicated, and you don’t need to be a tech expert to do it. If you’re looking for a way to organize your blog and make your content more accessible to your audience, this blog post is for you. Let’s get started!

Why You Should Add a Featured/Recent Blog Posts Section
Before we jump into the technical steps, let’s talk about why a featured or recent posts section would be great for your blog!
As an online business owner, you probably have a wealth of valuable content on your blog. However, if your best posts are hard to find, they’re not serving their full potential. A featured or recent posts section can offer several advantages:
- It keeps your blog & content fresh: Highlighting your newest or most important posts ensures that your audience is always exposed to your latest content and your best work without you having to manually update it each time. It’s perfect for your homepage to showcase your latest work, or on your blog page to highlight specific content you want visitors to see first.
- It organizes your content: A clear, well-organized blog will make it easier for your readers to find what they’re looking for, which leads to a better user experience.
- It encourages interaction: When readers can easily access new posts, they are more likely to explore further, stay longer on your site, and engage with your content.
How Create a Featured/Recent Posts Blog Section on Your Showit Website
Now that you’re sold on the idea, let’s get down to business. The way to do it is with the Post View Look Up feature, which is relatively simple! I’ll walk you through it step-by-step.
Step 1: Design Your Featured Post Layout
The first step is to create a new section on your blog using “Post View Lookup” as seen below. You will see the setting under Canvas Settings when clicking on it, it usually starts off as Static Content. This feature is only accessible on WordPress pages. If you want your homepage to auto-update with your latest blog posts, you’ll need to switch it to a blog template on Showit.

You’ll create a design using WordPress placeholders (under text properties & image settings) for everything you want shown for each post such as:
- Featured Image
- Post Title
- Category Label
- Date
- Excerpt or Description
The placeholders are what tells Showit to pull in your blog content automatically!
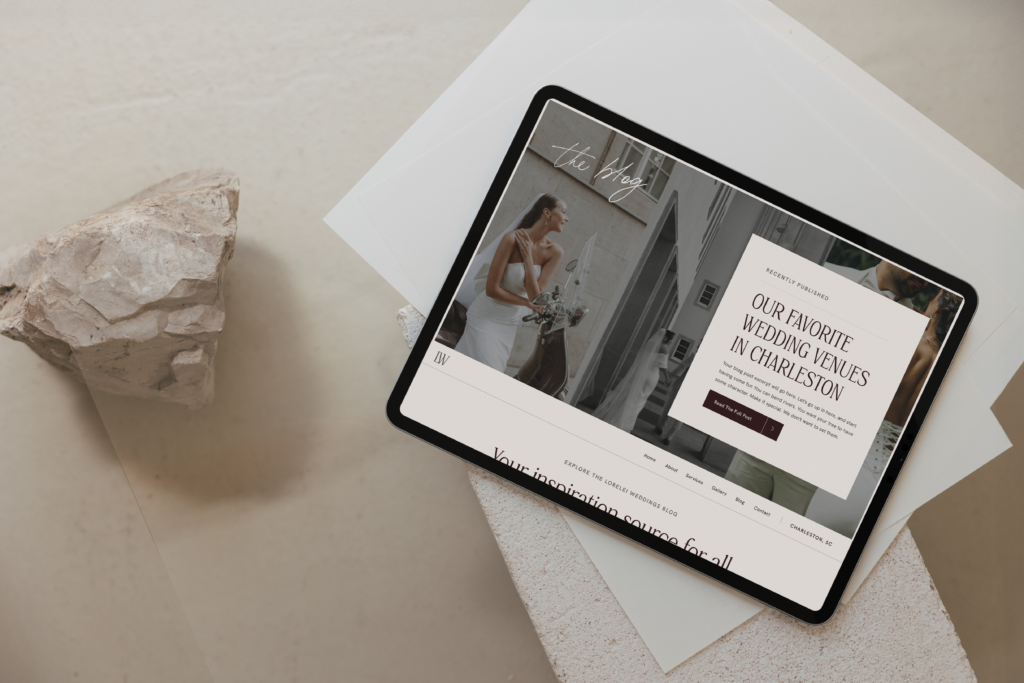
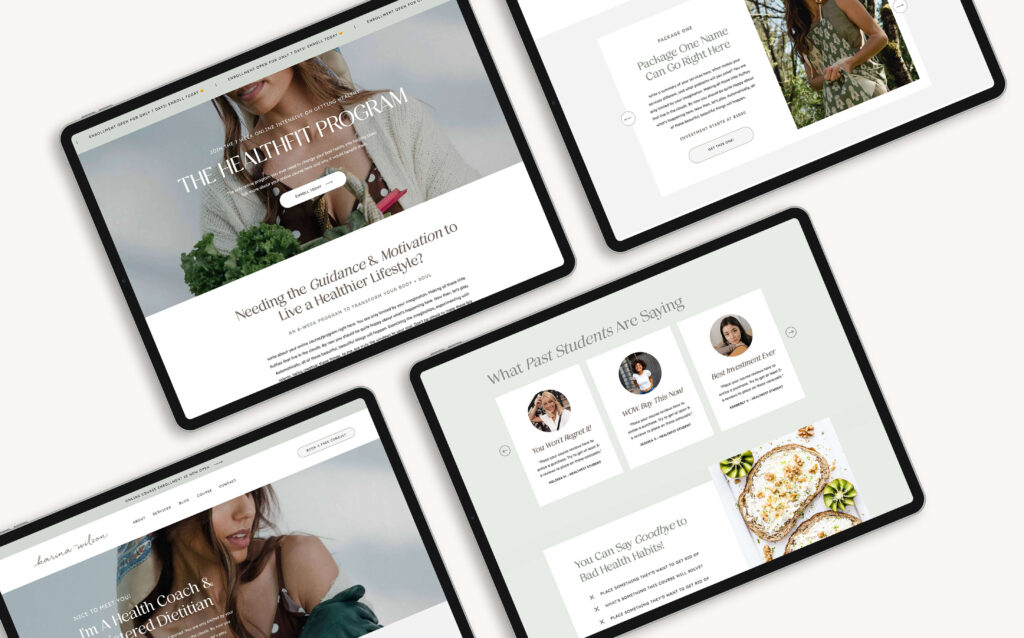
This is where you can truly let your creativity shine. There’s no one-size-fits-all approach here. Maybe you want one large featured post that spans the width of your page to highlight your most important content. Or perhaps you prefer a grid of three posts side by side for a clean, magazine-style look. You could even create a vertical stack with smaller thumbnails. The beauty of Showit is that you can design your featured posts section to perfectly complement your brand aesthetic and site layout—so don’t be afraid to experiment!
Optional: Make It Interactive!
- Auto Advance Views: Your featured posts would automatically cycle through, showing visitors more of your content
- Click Through Views: Add arrow icons with click actions so visitors can manually browse through your featured posts
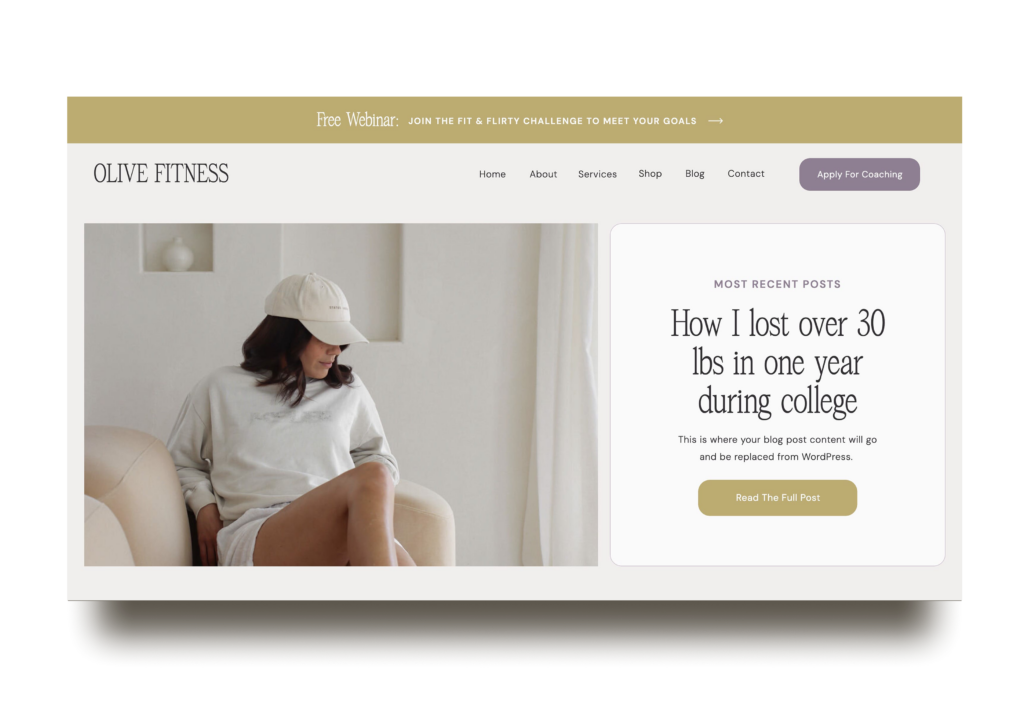

These gorgeous layouts are all screenshots from my best-selling Showit templates. If designing from scratch feels overwhelming, you can snag one of these template designs and customize it to your brand. You can start with a professionally designed foundation that already includes these featured post sections if you’d like.
Step 2: Organize & Connect to WordPress
Once you’ve finished designing your ideal featured post layout:
- Add a canvas view folder and move all of your placeholder elements into this view folder
- If you’re creating a side-by-side layout (like featuring 3 posts in a row), separate each post into its own canvas view
- Choose what posts to display. If you’re doing recent posts, simply leave the category/tag fields blank and Showit will automatically pull in your most recent posts by order. If you’re doing featured posts, define a tag name slug (like “featured”) and make sure you’ve actually tagged at least one blog post with this tag in WordPress!
I highly recommend using Tags rather than Categories for your featured posts. This lets you keep your posts in their proper categories while also marking certain posts as “featured” to appear in your special sections.
Extra Tips for a Standout Blog Section
Now that you’ve set up your featured or recent posts section, let’s look at a few simple but impactful ways to make it truly shine.
1. Create Engaging and Specific Post Titles
A strong post title is your first opportunity to capture attention. Rather than sticking to generic titles like “Blog Post 1,” try to make your titles more engaging. Aim for titles that spark curiosity or offer value to your audience, like “5 Social Media Mistakes You’re Probably Making” or “3 Ways to Stay Productive While Working From Home.” The more specific and intriguing, the better!
If you need some inspiration or ideas, take a look at our blog posts!
2. Organize Posts with Clear, Relevant Categories
When setting up categories for your posts, keep them simple, but descriptive. Choose category names that directly speak to what your audience cares about, like “Client Success Stories,” “Mindset Tips,” or “Growth Strategies.” The goal is to make it easy for your readers to find the content that’s most relevant to them.
3. Keep the Layout Clean and Simple
It’s easy to get carried away with lots of design elements, but a cluttered blog section can be overwhelming for your readers. Keep your featured or recent posts section neat and organized. Display only a few key posts at a time, with an easy-to-read layout, and let your content do the talking. Remember, simplicity often works best!
4. Encourage Exploration with Internal Links
Increase your engagement by linking to other related posts within your blog content. This not only keeps your visitors on your site longer but also helps them discover more of your work. For example, you could link to a related post at the end of each blog, or even within the text where relevant. This creates a smooth, connected reading experience and encourages visitors to explore more of what you offer.
Wrapping It Up
There you have it! Setting up a featured/recent posts section on your Showit blog will make a huge difference in how you present your content.
With the Post View Look Up widget, you can showcase posts by category, choose how many to display, and customize the design to fit your brand’s unique style. It’s a great way to keep your blog organized and ensure that your audience always has fresh, relevant content to explore.
If you’re looking to take your Showit website to the next level, whether it’s with a custom design or a fresh template, feel free to check out our Showit template shop or check out our custom website design services. I’d love to help bring your vision to life!
Disclaimer: This post includes affiliate links. If you go through them to make a purchase, we will earn a commission. Keep in mind that we only share about companies that we truly believe in and use ourselves! For more details on affiliate links, please visit our terms of use.

Feminine, Clean, Modern
Jessie Showit Template
Compatible With:

Budget-Friendly Showit Templates: Designed to help beginners create stunning websites with confidence. Starting at $275.

Bold, Editorial, Luxurious
Hailey Showit Template
Compatible With:


Inviting, Clean, Calm
Stacey Showit Template
Compatible With:

flodesk Email Templates
Showit Website Templates

Welcome Email Template
Jessie Flodesk Template
Compatible With:

DIY Email Templates: Pre-designed email templates that help you connect with your audience and grow your business.

Welcome Email Template
Hailey Flodesk Template
Compatible With:


Package & Pricing Email Template
Audrina Flodesk Template
Compatible With:

flodesk Email Templates
Showit Website Templates
Shop Our Best-Selling Design Templates


We help create a strategic custom designs that reflects who you really are, helps you reach your biggest business goals, and positions you as the expert you are. From comprehensive brand strategy and logo design to custom Showit websites you can actually update yourself, we handle every detail so you don't have to. Let's create something you'll be proud to call yours.
We take the time to understand your vision (& bring it to life for you)
Certified Showit & Flodesk Design Partner, hundreds of happy clients worldwide, and 3 consecutive "Best Web Designer" awards in our county.

Maybe your website is pretty good, but something feels off and you're wondering if it's time for an overhaul? Our comprehensive website audit checklist helps you evaluate your current site like a pro. Find out exactly what your site needs.
Get Your free audit checklist
Not sure if you need a full redesign or just some tweaks?

